September 28, 2016

Paper Bag Owl Puppet Craft

Puppet Paper Bag Owl

Brought to you by:


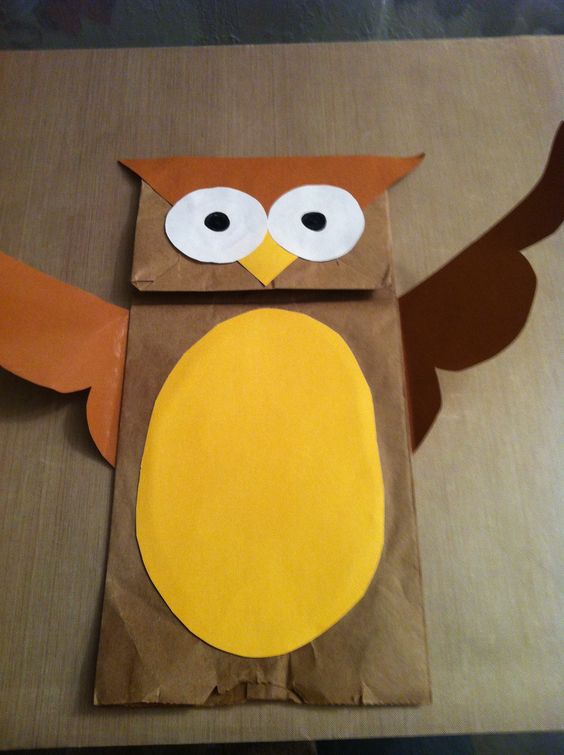
Another fun craft to do with your kids to get in the spirit of the Fall season!
The paper bag owl craft is something the kids can have fun with over and over again!

Materials:
1.   Paper bag
2.   Construction Paper
3.   Kwik Stix
4.   Glue
5.   Scissors


Directions:
1.   Flip your bag over so that the flap is on the top, facing you. Cut out two circles from construction paper about the size of a silver dollar and glue them on to the center of flap.
2.   In the center of each construction paper circle, use Kwik Stix to paint on the owl’s eyes and beak.
3.   Cut out two small triangles for the owl "ears." Glue the ears to the back of the top of the flap.
4.   Cut out two large wings from construction paper and glue them to the back of the paper bag about halfway down.
5.   Once everything is dry, slip your hand inside and you can flap the beak up and down to make your owl hoot and take flight!


September 21, 2016

Clothespin Airplane Craft

Clothespin Airplane

Brought to you by:


Materials:
1.   Craft sticks
2.   Large clothespins
3.   Kwik Stix
4.   Glue dots
5.   White craft clue
6.   Scissors


Directions:
1.   Use Kwik Stix to begin painting your craft sticks.
2.   Cut a craft stick in half, then cut off the rounded end. Cut one side of the rounded end off to use for the vertical tail. You can get two tail wings from one craft stick.
3.   Place the surface that you want the glue dot to stick to (in this case, the craft stick for the wing) onto the dot that’s still on the plastic backing. Press then lift. The glue dot will peel off the plastic backing and stay on your surface.
4.   Now press the craft stick, glue dot side down, onto the top of the clothespin. Repeat this for a second wing on the bottom of the clothespin. You can use 4 sticks total if you like, or just 2.
5.   Use a glue dot to attach the horizontal tail wing to the back of the clothespin.
6.   Press the flat edge of the vertical tail wing into the glue dot and pull it off the plastic backing, then press it onto the horizontal tail wing.
7.    If you need to you can add white glue to any or all of the craft sticks to make them last longer.


You are now ready for take-off!


September 14, 2016

Fish Plate Craft

Fish Plate
Brought to you by:


Materials:
·         Paper plates (2 per fish)
·         Kwik Stix
·         Scissors
·         Round adhesive labels
·         Googly eyes or buttons
·         Pencil
·         Glue


Directions:
1.       First, decorate one paper plates as body of fish. This is where the Kwik Stix will come in handy!
2.      Next, cut round labels in half to make scales and stick them on the plate.
3.      Next step is to paint on an eye, or glue on a googly eye or button.
4.      Finally, use the Kwik Stix to paint on a mouth.

Have Fun!